Showing posts with label honey. Show all posts

Thursday, December 1, 2011

PERSIMMON MARMALADE & QUINCE-APPLE SAUCE

Heart-shaped Hachiya persimmons.
photo courtesy of Pixmax


It really should not surprise me, knowing just how many different, unique and nutritional fruits are available for canning and preserving, but sometimes I am pleasantly startled by the local bounty sitting right under my nose.

Bookmark and Share

I have learned that taking the time to put aside fresh foods in season is good not only for my physical health, but for my mental health as well. I love the gathering, planning, chopping, blending, cooking, processing, not to mention the fun of recipe researching, as well as being rewarded with shelves of lovely, delicious bottles of goodies to share with my family and friends.

In that spirit, I decided to make sure I paid closer attention to local bounty, which led me to two fruits which are relatively under appreciated, but steadily regaining popularity here in the United States: the persimmon and the quince.


Though persimmons are Japan's national fruit, many Americans are unfamiliar with them. With persimmon season running from late October through December here in the northeast, now is the perfect time to try something different.

There are two types of persimmons: Fuyu and Hachiya. Fuyu persimmons are squat and dense. Their skin ranges from pale yellow-orange to brilliant reddish-orange; generally, the darker the color, the sweeter the taste. Fuyu persimmons are non-astringent, which means you can eat them either firm or soft. Firm Fuyus can be eaten like an apple, skin and all, and when you slice off the top, a beautiful star is centered in the flesh.

Heart-shaped Hachiya persimmons have a deep orange skin. Hachiyas are astringent, which means they can be eaten only when fully ripe. When a Hachiya persimmon is ripe, it should feel very soft, almost mushy. If you purchase some and they are still firm, place them in a paper bag with a banana and set on a pantry shelf for a few days.

For me the persimmon’s exotic flavor, reminiscent of apricot/mango, brings to mind warm tropical breezes. When perfectly ripe, the coral colored flesh scoops easily from its skin with a spoon, already resembles jelly.


I preserved Hachiya persimmons as a marmalade using a simple vintage recipe I discovered through Uncle Phaedrus, Consulting Detective and Founder of Lost Recipes; but there are many other fun and tasty persimmon recipes if marmalades are not your thing.

Persimmon and Granny Smith Salsa or Persimmon, Gingersnap, and Caramel Sundaes, can be found on Food Blogga. CHOW also has a fabulous recipe for Boozy Persimmon Pudding.


PERSIMMON MARMALADE

 
INGREDIENTS

2 Quarts ripe Persimmons

¾ Cup Honey

1 Cup Orange Juice

Grated rind of 1 Orange

5-7 Half Pint Jars


DIRECTIONS

Cut the tops off the persimmons; scoop out the flesh; discard seeds and cores.

Mash Persimmons and cook with Honey, Orange Juice and Orange Rind over medium heat until mixture is thick. Do not allow to boil.

Ladle into canning jars leaving 1/4  inch headspace.

Process in a Boiling Hot Water Bath for 10 minutes


The birthplace of the Quince is believed to have been the Fertile Crescent in Asia Minor, the cradle of civilization. From there it spread to the Mediterranean, delighting Greeks and Romans with its tart  flavor and potent aroma.

A bowl of quinces, or in my case a bag on the counter waiting to be preserved, perfumes the air. Once you have worked with quinces and had their fragrance lingering in your kitchen, you will forever dream of that time of year when they will once again decorate your counter and intoxicate you with their aroma.

The whitish quince flesh turns rosy when cooked, and is traditionally stewed, poached, or baked in desserts, often with other fruits. It is especially prized in the Middle East but also well-loved in South America, where it is often used in savory meat dishes. In Spain, quince becomes a dense paste to eat with cheese.

The quince was popular in Colonial America, and quinces grew at Thomas Jefferson's Monticello. Having grown up in Connecticut I was familiar with quinces, but had never had the opportunity to track some down for preserving. Luckily I have some personal ties to the Averill Orchard in Washington, Connecticut. Though they only have a few trees and do not usually sell these golden apples to the public, I was able to wrangle a peck for adding to my apple sauce.

Here in the Northeast United States, the skin of the bumpy, pear-shaped quince is rough and woolly and needs a good scrubbing before you use it in your recipes, and are not palatable to eat as you would an apple, but poached, stewed, sauced or jellied they add a sweet dimension to many a dish.

My simple recipe for Quince-Applesauce is a quick and easy way to familiarize yourself with the fruit. Besides, with Thanksgiving and Christmas holidays right around the corner, who couldn’t use a few jars of homemade sauce for the dinner table? And this applesauce with the added quince will leave everyone who tastes it begging for more.

If you want to try quince in a dinner dish, check this out:
SAFFRON INFUSED CHICKEN WITH QUINCE / Heyvali ve Zeferanli Toyuq

For more interesting facts and a few vintage recipes for quince click here.


Local Quince and Apples from Averill Orchards in Washington, Connecticut.

 
QUINCE-APPLE SAUCE

 
INGREDIENTS

1 Peck whole Quinces

1/2 Peck whole Apples

2 cups Apple Cider

1/2 cup Honey

2 Tbsp. Cinnamon

1/4 Cup Brown Sugar

6 – 8  Pint Jars


 DIRECTIONS

Wash the Quinces and Apples well, and cut into chunks. Leave in the cores and seeds, but cut out bruised portions, stems, and the blossom end of the fruits.

Place in a large pot with a lid, along with the apple cider.

Bring to simmer over medium heat, stirring occasionally to moisten all the fruit; reduce heat to low.

Leaving the lid a bit ajar, cook for a few hours, stirring occasionally, until the fruit is mushy. Be careful not to let the fruit burn on the bottom of the pot.

Remove from heat and scoop the fruit into a food mill.

Puree, and then taste. Adjust more or less until sauce is at desired sweetness with the honey and brown sugar. Add in cinnamon. Stir thoroughly.

Return to pot and bring to simmer again. You want the sauce hot when you add to the jars.


Ladle into clean canning jars, leaving 1/2 inch headspace. Use a knife to remove any air pockets.
If you have leftovers that won’t fill up a jar, keep in refrigerator for immediate treat.

Process jars in a Boiling Hot Water Bath 15 minutes.

Hot Water Bath or Pressure Canning

Tuesday, November 8, 2011

ROSE HIP JELLY


Bookmark and Share


The fruit of the Rosa Rugosa resemble tiny tomatoes, and anyone who has been near the shore – for me Cape Cod, Block Island, Maine – you find them growing wild on the shifting dunes. The sweet, distinctly scented flowers are often used to make pot-pourri, but the hips, also called haws by some, are well-known for making tea, wine, or creating a jam or jelly.

Rose hips are legendary for being high in Vitamin C, and there is no doubt in anyone’s mind about the beneficial effects of vitamin C. In addition to C, rose hips also contain A, D, Iron and E - all wrapped up in the tart-sweet taste of these miniature fruits.


The hips have seeds on the inside that are covered with tiny-weenie hairs that can be itchy and irritating. However, when making jelly the seeds will get strained out in the jelly-making process, so, it is easiest just to trim off the top and bottom of the hip. Also, when making this jelly you definitely want to use a non-reactive pan, like enamel or stainless steel. Do not use aluminum or cast iron to cook the rosehips.


 ROSE HIP JELLY


INGREDIENTS

2 quarts Rose Hips (plus or minus)

½ Cup Lemon Juice


¼ teaspoon Butter

3 Cups Raw Sugar

¼ Cup Honey

Several Crab Apples or one large Green Apple

1 package Powdered Pectin (or Homemade Pectin)

Water

5 or 6 Eight-ounce canning jars and fresh lids


DIRECTIONS

Rinse the rose hips and apples thoroughly. Cut off the tops and bottoms of the rose hips and discard. Cut apples into small pieces leaving skin and seeds.

Place rose hips and apple in a large pot. Add enough water to cover. If fruit begins to float, temporarily cover with a dinner plate or something similar for water measurement. Remove the plate before cooking.


Bring hips to a boil and stir constantly for 5 minutes before reducing heat to simmer. Cover and cook for 1 hour (more or less), until rose hips are soft. Stir occasionally so they do not stick to your pot. It is fine to mash the hips against the side of the pan as you stir. I also use a food mill to grind the pulp once it is soft, or you can use a potato masher, or just squish everything up as best you can with the back of a flat spoon.

Set up a jelly bag, or a large very fine mesh strainer, or three layers of cheesecloth over a bowl or large pot. Transfer the rose hip, apples and liquid (or puree)  into the jelly bag/strainer/cheesecloth. Let strain into the bowl for a minimum of one hour . Do not squeeze the jelly bag or cheesecloth to get more remaining juice out, it will make your jelly cloudy.


Measure the juice. You will need 3 cups of juice for this recipe, so if you have less than 3 cups, add some boiling water to the jelly bag and allow more liquid to drain through.


Place 3 cups of the rose hip juice in a large, non-reactive pot. Add the honey, lemon juice, and pectin. Bring to a boil, stirring constantly dissolving all of the pectin. Add the sugar, also stirring constantly until dissolves, then add the butter.

Bring jelly to a rolling boil (one that you cannot reduce by stirring). The mixture will bubble up considerably. Boil for exactly one minute. Then remove from heat and pour off into sterilized canning jars, leaving 1/4-inch headspace from the rim.

Make sure rims are clean and sterilized tops are finger tight on the jars, then process in a Hot Water Bath for 10 minutes. Voila, a lovely bit of summer in a jar.  Enjoy!


Hot Water Bath or Pressure Canning

Saturday, March 12, 2011

HONEY SPICE POUND CAKE WITH CLEMENTINES AND PLUMS


Bookmark and Share


I believe that if you love to preserve or can foods then you love to cook and enjoy fine dining, not just eating.  For me, half the fun of putting by small batch preserves is also discovering ways to incorporate those rainbows of color and flavor into your baking, your daily meals, creating delectable dishes to share with those you love.
It is from that desire that I used a jar of my Clementines in Honey-Spice Syrup to create a Honey Spice Pound Cake.  The cake recipe is similar to a pound cake, and if you like the idea but have no preserved clementines you could use any other type of fruit instead, like blueberries, or pineapple or bing cherries.
 
Go ahead get creative, after all that is what cooking is all about.


HONEY SPICE POUND CAKE 

 
INGREDIENTS

1 3/4 Cups Raw Sugar

1/2 Cup unsalted Butter, softened

1/2 Cup low-fat fat Cream Cheese, softened

3 large Eggs (room temperature)

1 Tbs zest of Lemon

Juice of 1 lemon (about 3 Tablespoons)

2 teaspoon Vanilla

3 cups sifted All-Purpose Flour

1 cup preserved Clementine slices including ginger bits

1 cup diced dried Plums

4 teaspoon Honey Spice Syrup

1 teaspoon Baking Powder

1/2 teaspoon Baking Soda

1/2 teaspoon Salt

1-6 oz carton Fage Total 0% Greek Yogurt

1/2 Cup sifted Confectionary Sugar

Cooking spray


DIRECTIONS

Preheat oven to 350 degrees.

Gather all ingredients.  Drain pint jar of Clementines in Honey Spice Syrup reserving liquid.

Beat the sugar, butter and cream cheese at medium speed with a mixer until well blended. 

Add the eggs one at a time, beating well after each addition.  Beat in the vanilla, lemon juice and lemon zest.

In a smaller bowl measure the 3 cups of flour.  Remove 2 Tbs and sprinkle over the fruit, gently stirring and tossing to coat.

To the remaining flour add the baking powder, baking soda and salt, stir to combine.  Add the flour mixture to the sugar mixture alternately with the yogurt, be careful not to over-mix.  Gently, fold in the Clementine slices and plum pieces.

Pour the batter into a 10-inch tube pan or bundt pan coated with cooking spray.  Sharply tap the pan once on the counter to remove air bubbles.  Bake for 1 hour and 15 minutes more or less depending on your oven, or until a wooden pick inserted in the center comes out clean.

Cool the cake in the pan for 15 minutes on a wire rack.  Remove cake from the pan.  Allow to cool completely.

Combine the powdered sugar and honey-spice syrup in a small bowl and whisk until smooth.  Drizzle over the cake.


Wednesday, January 26, 2011

HONEY

[huhn-ee] 

a sweet fluid produced by bees from the nectar collected from flowers and stored in nests or hives as food. This substance is used in cooking or as a spread or sweetener.

Keep in mind, adjustments need to be made to a recipe when substituting honey for sugar.

1.  Use equal amounts of honey for sugar up to one cup. Over one cup, replace each cup of sugar with 2/3 to 3/4 cup over honey depending on your sweet tooth.

2.  In recipes using more than one cup honey for sugar, you may want to reduce other liquids by 1/4 cup per cup of honey.

3. Lower the baking temperature 25 degrees, baked goods will brown faster.

4.  In baked goods, if baking soda is not already included in the recipe add 1/4 teaspoon of baking soda per cup of honey.

Cooking Tip: Moisten a measuring spoon or cup first with water, oil, or an egg before measuring the honey to prevent it from sticking to the measuring utensil. 


Bookmark and Share

Saturday, January 22, 2011

HONEY

We all probably have a jar of honey stored in our pantry, but have you ever stopped to consider what it actually took to get it there?   A bottle of pure honey is produced naturally. Known by the Greeks and Romans as the Birds of the Muses, honeybees produce honey by gathering nectar, which they place in the honeycomb cells of their hive. Bees must tap approximately two million flowers to make one pound of honey.  That sticky-sweet amber liquid enjoyed by humans for centuries is an all natural sweetener purported to contain restorative properties; if you can’t bottle it yourself you want to make friends with someone who does.

Homespun honey from Bagg's Apiary,
New Milford, Connecticut
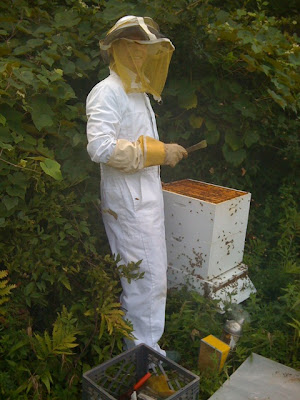
Like gardens on city rooftops or chickens in a deserted tenement, bees can be kept almost anywhere.  Bee “farmers”, mostly on the West Coast and in the Midwest here in the United States, move thousands of hives a year, assisting in the pollination of crops, helping to feed the world. We have all heard stories of hives in walls, or swarms in the unlikeliest of places; whether they live in glass-designed hives for your viewing pleasure, like the one at the White Memorial Conservation Center in Litchfield, Connecticut, or nest in an unwanted invasion of a home or outbuilding, bees are adaptable.

Here in New England you may pass multicolored stacks of bee “houses” in overgrown fields, or rows of pristine white boxes in the aisles of orchards.  No matter their aesthetics, these towers are home to bees busily buzzing, feeding their colony, creating delicious honey.

The beautiful thing about bees is that they are perfect little machines operating in harmony with the earth’s ecosystem, and have been doing so for hundreds of thousands of years. They are tried and true producers of a healthy sweet, accomplishing this feat while not only NOT polluting their environment (and ours), but also assisting in the successful reproductive process of fruit and nut trees, vegetables, and the beautiful flowers we all love so much.  I am sure there were bees in the Garden of Eden, or at least in the Land of Milk and Honey.

I love gardening and I love to share the fruits of that labor with family and friends.  Being able to share the additional benefit of homespun honey would simply sweeten the pot for us all. Bottling our own honey hasn’t happened yet for two reasons:  one – we just gained access to a hive last summer and it takes a year to establish a colony and be able to harvest; and two – we haven’t collected all the equipment or expertise required to get that savory liquid gold into the pretty little bottles we are collecting, but we will. In the meantime, our friend and bee keeper, Mark Bagg of New Milford, Connecticut, is tutoring us in the ways of the honeybee. This is what we have learned so far.

Mark Bagg, Bee Keeper
Bee hives are made so that their frames are easily removed, which is good news for those doing the harvesting. Modern beehives are made up of a series of square or rectangular boxes without tops or bottoms placed one on top of another. Inside the boxes, parallel frames are hung in which bees build up the wax honeycomb where they store honey. A comb is ready to be harvested when it’s about 80% sealed over. Ripe honey, when removed properly from the hive by the beekeeper, has a long shelf life and will not ferment. Mark tells me archaeologists recovered honey from the Tombs of the Pharaohs, and while it had crystallized it was still edible.

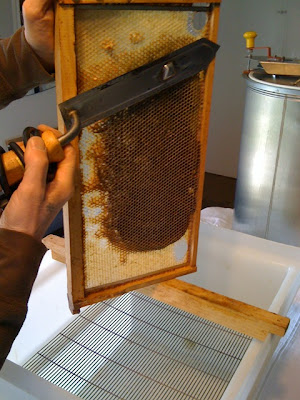
Basic tools and procedures for extracting honey:


Uncapping knife - A heated knife for slicing off the cappings from combs of honey.


Uncapping tank - A container for receiving the cappings. Wet cappings fall onto a screen, and honey drips through to the bottom of the tank and out a spigot.


Extractor - A drum containing a rotating wire basket. Uncapped combs are placed in the basket and the basket is turned by hand or by motor. Centrifugal force removes the honey from the combs onto the sides of the tank, eventually draining through a spigot in the bottom. Emptied combs can be returned to the hive for the bees to clean and use again. With care, combs can be recycled for years.


Strainer - A mesh of coarse screen or cloth directly under the extractor spigot. This filters out large debris such as wax.


Storage tank - A large tank with a spigot, or "honey gate," at the bottom. As honey settles in the tank, air bubbles and small debris rise to the top and can be skimmed off, allowing honey that is bottled from the honey gate to be clear and attractive. 


So there you have it.  The very basics of beekeeping, but like I said if its something you can't do yourself you can still enjoy local bottled honey anytime of year. Use it in your tea, on toast with butter, use it when baking instead of sugar. Honey, an all-natural sweetener, and that's hard to beat!


photo credits: Mark Bagg and Rick Rosabella

Bookmark and Share

Friday, January 7, 2011

CLEMENTINES IN HONEY- SPICE SYRUP

Throughout the winter, when they are in season and readily available, clementines sweetly provide needed Vitamin C. Small, easy to peel, sweeter than tart, with few if any seeds they are easy to preserve.

Bookmark and Share

Historians believe that the clementine was developed early in the 20th century by Father Clement Rodier, a French missionary, in the garden of his orphanage in Misserghin, Algeria. Cardamom plays an important role in Algerian sweets; paired with star anise in a gingery honey syrup this recipe produces a romantic aroma. Leftover syrup makes a creative base for fruit salads, a sweetener for smoothies, or as a saucy reduction for pork or chicken.

Usually available from December through February, canning these and other delectable citrus delicacies makes them available throughout the year.


CLEMENTINES IN HONEY- SPICE SYRUP


Variations: Substitute 1-1/2 lb. seedless thin-skinned oranges, such as Valencia or Tangerines. Blood Oranges or grapefruit with their tart flavor also blend well with this spiced syrup.


INGREDIENTS

½ Cup Honey

2 Cups Water

¼ cup thinly sliced peeled Ginger

4 Green Cardamom pods

1 whole Star Anise

3 whole Cloves

1 Cinnamon Stick

1 and 1/2 lbs. firm Clementines (5 to 7) or other citrus, peeled and segmented


DIRECTIONS

Tie Cloves, Cardamom Pods, Star Anise and Cinnamon Stick into a cheesecloth or muslin bag (I call this Spice Garni).

In a 4-quart saucepan, bring the water, Honey, Ginger, and Spice Garni to a boil over high heat, boil 3 minutes to concentrate the flavors. Let rest for several minutes. Remove Spice Garni from saucepan.

In the meantime, gently pack the slices into canning jars.

Ladle hot syrup (evenly distributing the ginger bits) into the jars over the slices leaving ½ inch head space; discard any excess syrup.

Process in a Hot Water bath for 10 minutes. Rest on shelf for at least one month before serving. Refrigerate after opening. 

If you would like to skip the Hot Water Bath and make a batch to keep in the refrigerator for several months bring the water, Honey, Ginger, and Spice Garni to a boil over high heat.

Remove from stove top, gently slip in Clementine segments, return to boil. Boil gently for 2 minutes.

Remove pan from stove top, using slotted spoon pack segments into jars.

Return syrup to stove top; boil 3 minutes to concentrate the flavors.
Remember that this is a small batch process so you should end up with three half-pint jars to enjoy.

Remove Spice Garni from saucepan. Ladle liquid into jars. Cap, cool, refrigerate, enjoy!

If you would like to store on the pantry shelf for up to a year, following the guidelines for safe Hot Water Bath Canning and process for 10 minutes.  Store on cool, dark shelf.

There are many ways to use these preserved Clementines.  One of my favorites is baking a Honey Spice Pound Cake.  Dense and sweet you can customize by adding other dried fruits.